设置本地存储库的一个优点是不需要互联网连接来安装软件包。
本文将介绍如何在CentOS 7上通过HTTP (Nginx) web服务器设置本地Yum存储库,并说明如何在CentOS 7客户端机器上查找和安装软件包。
环境说明
Yum HTTP存储库服务器: CentOS 7 [192.168.195.185]
客户端机器: CentOS 7 [192.168.195.186]
步骤1:安装Nginx Web Server
1.使用YUM包管理器从EPEL存储库安装Nginx HTTP服务器,如下所示。
# yum install epel-release
# yum install nginx
2.启动Nginx,并使它在系统启动时自动启动。
# systemctl start nginx
# systemctl enable nginx
# systemctl status nginx
3.打开端口80和443以允许web流量到Nginx服务
# firewall-cmd –zone=public –permanent –add-service=http
# firewall-cmd –zone=public –permanent –add-service=https
# firewall-cmd –reload
4.确认Nginx服务器已经启动并运行,使用以下URL能看到默认的Nginx网页。
http://SERVER_DOMAIN_NAME_OR_IP
步骤2:创建Yum本地存储库
5.安装创建、配置和管理本地存储库所需的软件包。
# yum install createrepo yum-utils
6.创建必要的目录(yum存储库),用于存储包和任何相关信息。
# mkdir -p /var/www/html/repos/{base,centosplus,extras,updates}
7.使用reposync工具将CentOS YUM存储库同步到本地目录,如图所示。
# reposync -g -l -d -m –repoid=base –newest-only –download-metadata –download_path=/var/www/html/repos/
# reposync -g -l -d -m –repoid=centosplus –newest-only –download-metadata –download_path=/var/www/html/repos/
# reposync -g -l -d -m –repoid=extras –newest-only –download-metadata –download_path=/var/www/html/repos/
# reposync -g -l -d -m –repoid=updates –newest-only –download-metadata –download_path=/var/www/html/repos/
上述命令选项含义:
- -g –启用删除下载后未通过GPG签名检查的软件包
- -l –启用yum插件支持
- -d –允许删除存储库中不再存在的本地包
- -m –允许下载comps.xml文件
- –repoid –指定存储库ID
- –newest-only –告诉reposync只拉取repos中每个包的最新版本
- –download-metadata –启用下载所有非默认元数据
- –download_path –指定下载软件包的路径
8.检查本地目录的内容,以确保所有包都已在本地同步
# ls -l /var/www/html/repos/base/
# ls -l /var/www/html/repos/base/Packages/
# ls -l /var/www/html/repos/centosplus/
# ls -l /var/www/html/repos/centosplus/Packages/
# ls -l /var/www/html/repos/extras/
# ls -l /var/www/html/repos/extras/Packages/
# ls -l /var/www/html/repos/updates/
# ls -l /var/www/html/repos/updates/Packages/
9.运行以下命令为本地存储库创建一个新的repodata
# createrepo /var/www/html/repos/base/
# createrepo /var/www/html/repos/centosplus/
# createrepo /var/www/html/repos/extras/
# createrepo -g comps.xml /var/www/html/repos/updates/
10. 为了能够通过web浏览器查看存储库和其中的包,创建一个指向存储库根目录的Nginx服务器配置文件。
# vim /etc/nginx/conf.d/repos.conf
将以下配置添加到repos .conf文件中。
server {
listen 80;
server_name repos.test.lab; #change test.lab to your real domain
root /var/www/html/repos;
location / {
index index.php index.html index.htm;
autoindex on; #enable listing of directory index
}
}
保存文件并关闭它。
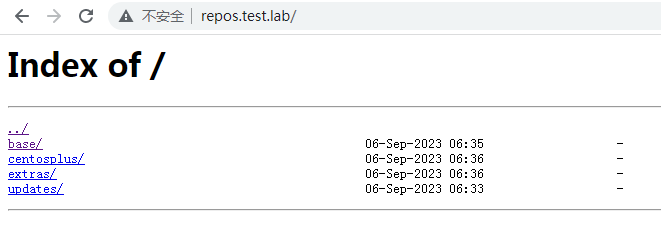
11.重新启动Nginx服务器,并使用以下URL从web浏览器查看存储库。
http://repos.test.lab
步骤3:创建一个Cron作业来同步和创建存储库
12.添加一个cron作业,它将自动同步本地repos与官方CentOS repos,以获取更新和安全补丁。
# vim /etc/cron.daily/update-localrepos
将这些命令添加到脚本中。
#!/bin/bash
##specify all local repositories in a single variable
LOCAL_REPOS=”base centosplus extras updates”
##a loop to update repos one at a time
for REPO in ${LOCAL_REPOS}; do
reposync -g -l -d -m –repoid=$REPO –newest-only –download-metadata –download_path=/var/www/html/repos/
createrepo /var/www/html/repos/$REPO/
done
保存脚本并关闭它,并为其设置适当的权限。
# chmod 755 /etc/cron.daily/update-localrepos
步骤4:在客户端机器上设置本地Yum存储库
13. 在CentOS客户机上,将您的本地repos添加到YUM配置中。
# vim /etc/yum.repos.d/local-repos.repo
将下面的配置复制并粘贴到local-repos文件中。(在必要时进行更改)。
[local-base]
name=CentOS Base
baseurl=http://repos.test.lab/base/
gpgcheck=0
enabled=1
[local-centosplus]
name=CentOS CentOSPlus
baseurl=http://repos.test.lab/centosplus/
gpgcheck=0
enabled=1
[local-extras]
name=CentOS Extras
baseurl=http://repos.test.lab/extras/
gpgcheck=0
enabled=1
[local-updates]
name=CentOS Updates
baseurl=http://repos.test.lab/updates/
gpgcheck=0
enabled=1
保存文件并开始使用本地YUM镜像。
14.运行以下命令在客户端机器上的可用YUM repos列表中查看本地repos。
# yum repolist
OR
# yum repolist all

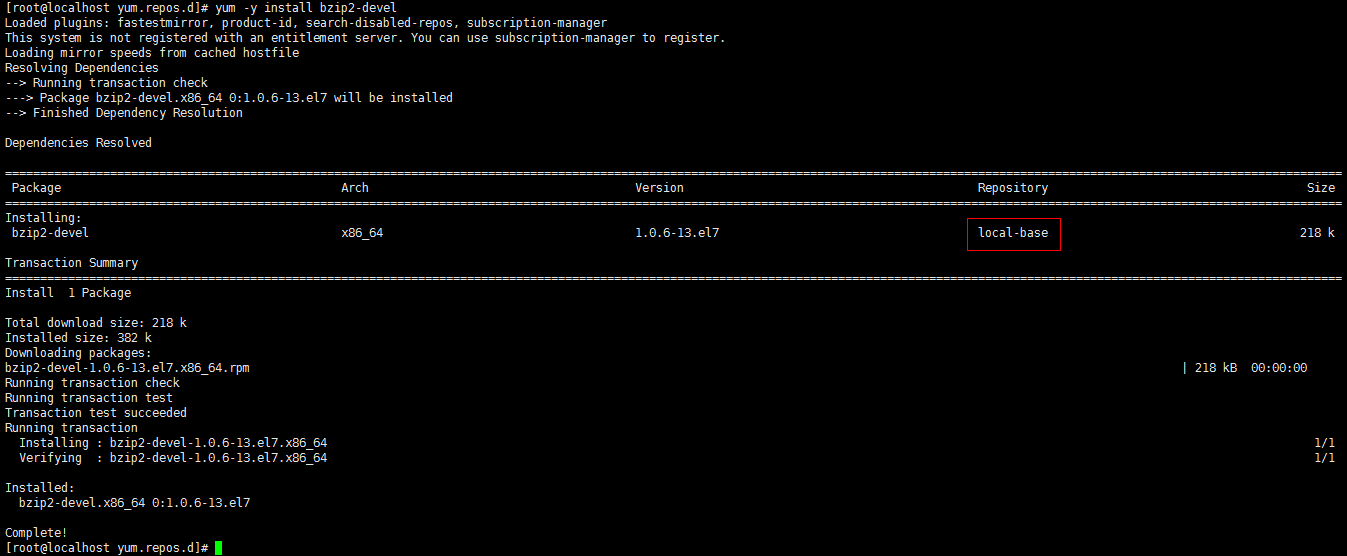
安装包:yum -y install bzip2-devel